Monday 26 March 2018

Cleaning mistakes that are really ruining your hardwood floor

The one thing that brings the whole room together is the flooring. So far, there’s hardly any floor finishing that beats the beauty of a hardwood floor. It has a timeless appeal. It is an elegant home staple that makes the home feel warm, special and natural. Who doesn’t dream of achieving that for their space?

And it is surprising how many people completely overlook the hardwood floor, because of its initial cost of installation. It’s a bit more expensive than the rest such as the carpet. Regardless, you reap very great benefits that totally outweigh what you initially invested. Good things don’t come cheap. If you already have the floor though, you don’t want to be among most that overlook the necessary maintenance of the floor.

You’ve invested much, therefore it is only normal for you to expect your floor to look as good as new for as long as possible. Being proactive will make a huge impact on its longevity and appearance. Therefore, starting by cleaning it regularly is a great first step. Sadly, that is where most of us make mistakes that are ruining the floor. We do it so innocently, but it doesn’t have to be the same. We got you because we know how cleaning errors are so easy to make. That is why we will unveil some of those that are totally damaging your floor.

Excess water

Image result for water on a hardwood floor images

Using excess water on your hardwood floor is the biggest mistake you can make while cleaning. Sure, it may look like it needs a pool of water after days without washing, while will definitely leaving the floor clean but damaged. Especially if you had no idea and keep doing it regularly. Water gets into the cracks between planks and causes swelling which damage your floor. Gradually, if your floor has been exposed to water, it will start rotting and growing mold. Little water goes a long way on floors, besides; you will use less effort to clean it anyway and still having it sparkling. You can also just use a dry mop to get the job done. Moreover, if the floor is stained, try spot cleaning. Deal with that the stains first by spraying the affected areas, then moving to mop the entire mop.

Using harsh cleaners

Image result for harsh cleaners on hardwood floors images

After investing much on the hardwood floor, many homeowners  would want to maintain its look by cleaning it with harsh cleaners to rid any visible or invisible stain. While your actions are appreciated and meant for the greater good of the floor, you are totally damaging the finishing. The cleaners contain chemicals that eat away the layers of your finishing, leaving it looking drained and pale. For starters, you might want to deal with a stain as soon as it happens. It is much easier removing them, in fact, all you’ll need is a disposable wet wipe. Blot spills immediately with an absorbent cloth. You actually don’t need to use any cleaner, just use a few drops of your dish-washing soap and your floor will be the cleanest on the block while preserving its beauty.

Using steam cleaners

Image result for steam cleaning images

Steam cleaners are a sworn enemy of the wooden floor. The excessive heat and moisture will not only ruin your finishing but also the wood beneath. By the time you realize, because it happens gradually, the damage is done and you will need a whole new floor.

Using  vinegar or ammonia

Vinegar has earned it’s place in our hearts by coming through in many ways during cleaning emergencies. It is, however, the biggest mistake people make when using vinegar as a remedy to clean their hardwood floor. When laundering, vinegar is preferred to other detergents because it is milder. Yet in actual fact, when it comes to floors, vinegar is acidic and will eat away at your finishing. Ammonia will also have the same effect as vinegar, giving your floor a blotchy look. Therefore avoid using any of these two directly or cleaners containing them.

Pouring cleaning products directly on the floor

It might not look harmful in any way while doing it but, it actually is. Besides, you should know that the cleaning product will still be effective when mixed with water in a bucket. You will, in fact, have an easier time getting rid of the suds. Just like water, any other excess liquid is absorbable to your wooden floor. Moreover, the cleaning products might pose more harm considering the chemicals they contain.

Using Wax

Using wax on your floor is meant to give it more gloss, but tends to attract dirt. Dirt, just like clutter always makes your home look uncared for. Therefore, you will need to clean for frequently. To avoid all that, abstain or irregularly use wax on your floor. Running a floor buffer has the same effect.

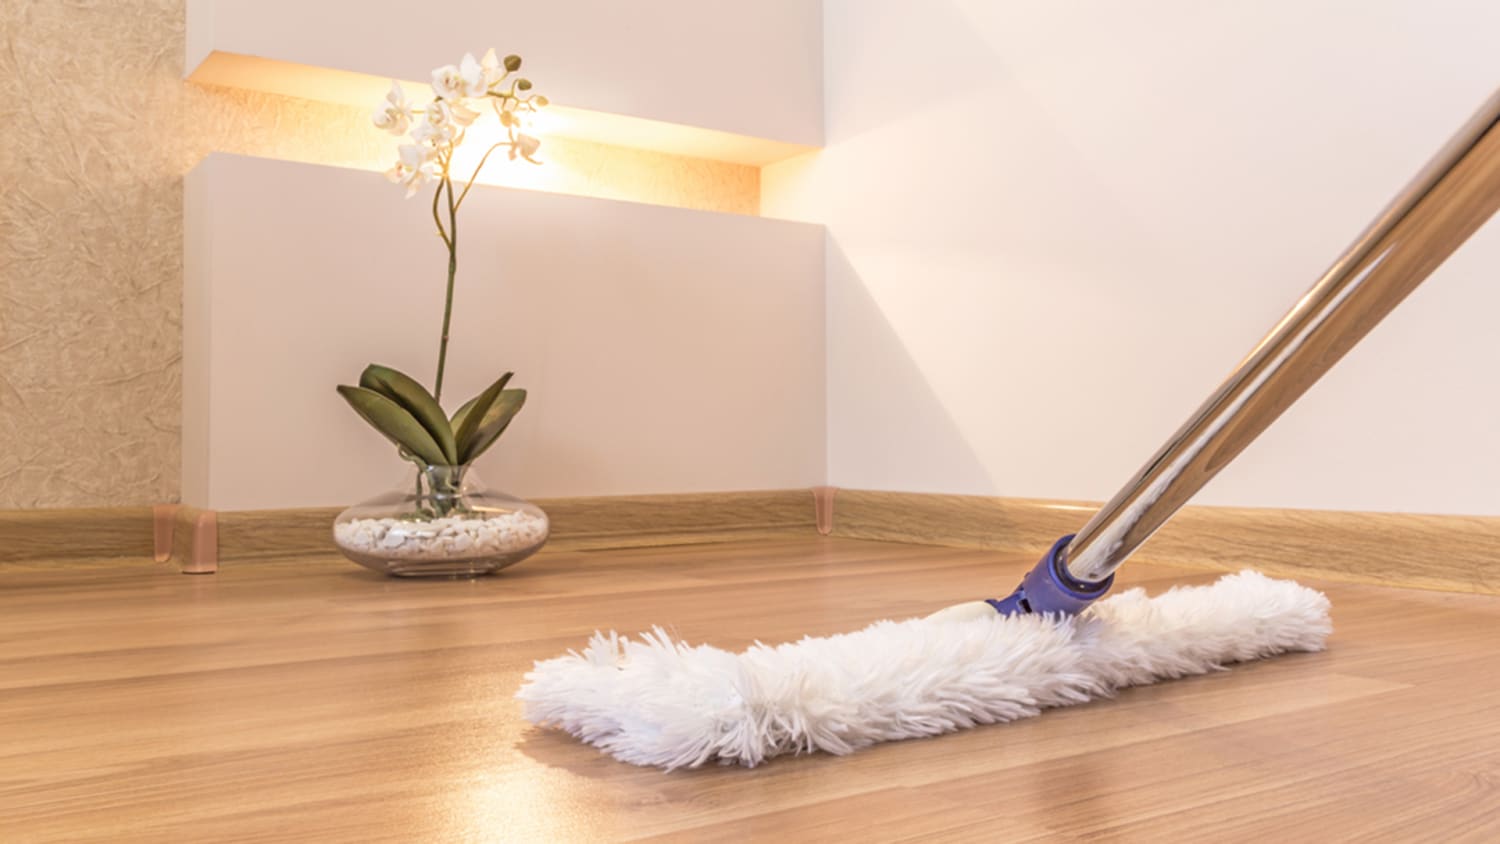
Using the vacuum wrongly; using the wrong mop

Did you know that not all mops are suitable for cleaning the wooden floor? That is how special your wooden floor is. Some mops will easily scratch and ruin your wood. Therefore, use only those meant for the wooden floor. It is also essential for you to use clean mops. Sounds like common sense but is worth mentioning. Dirty mops will scratch the floor with debris from the previous cleaning plus it defeats the whole purpose of cleaning in the first place. Using a vacuum with the wrong attachment will severely scratch your floor in seconds. Therefore, ensure the correct head is on the vacuum before cleaning.

Let us know which of the cleaning mistakes you are guilty of. For a tip, to maintain your hardwood  floor longer: You can enforce the ‘no-shoe-inside-the-house’ rule. You don’t need to wear shoes inside the house with a wood finishing. It will not only ensure your floor is clean for a longer period but also preserve it by reducing the scratch caused by debris. Placing mats on high traffic areas will also go a long way. Ensure you also have a place-mat beneath your pet’s water bowl.

The post Cleaning mistakes that are really ruining your hardwood floor appeared first on Cleaning Exec Cleaning Services.


from
https://cleaningexec.com/blog/cleaning-mistakes-really-ruining-hardwood-floor/

10 cleaning problems you can solve with baking soda

Baking soda, aka sodium bicarbonate, is popularly known and used for its cooking purposes. Apart from that though, it would blow your mind to know how much work a simple bag of baking soda can do. It is such a versatile product that comes through in all sorts of cleaning emergencies around your home. Its prowess ranges from cleaning, to personal hygiene, to cooking, and even medicine. Definitely, there are infinite products on the market that will get the job done, yet baking soda is the healthier option and just as effective, if not better.  We might also, as well show kindness to aquatic life because at the rate at which we are draining our cleaning products down the drain and into water bodies, they are soon going to be extinct. Besides, you will also be protecting yourself from an array of chemicals from harsh cleaning products.

Whether you are cutting on cost, being adventurous or preserving the environment, you are in the right place. We are going to share ways in which you can use baking soda to solve your cleaning problems, in which in no time, you will be replacing those bottles with soda ash. You totally have nothing to lose; in fact, you never know when the information may be helpful. Here are some great ways you can use sodium bicarbonate.

Rid stains off your wall

Image result for washing stained walls images

Washing off stains from walls and floors do not even come close to top 10 chores you enjoy doing (if there are any), but very critical for the general view of your home. Therefore, with just an addition of water, nearly every dirty spot can benefit from a baking soda treatment. With kids around, it is almost inevitable to have stainless walls. And when they showcase their artwork on your wall, you are torn between being proud or crying yourself to sleep because guess who’s going to do the cleaning? But with a 50/50 mixture of baking soda and water, you can get rid of crayon or scuff marks.

Cleaning the grout

Image result for cleaning grout images

What is more annoying than having a clean floor but with grouts that have lost their color due to stain? They just ruin the whole look. Although many homeowners notice, most of them don’t know what they might do to get them looking great again. You don’t have to break the bank in renovations, just take your baking soda and sprinkle it on the grout line. Then sprinkle some water and let it sit for a while. Come back and you will need minimal scrubbing to get the cleanest grout on the block.

Unclogging the sink

Image result for unclogging the sink images

We’ve all been there at some point; clogged sink can be such a pain and be impressively inconvenient. We won’t even talk about how smelly it gets. Therefore, it is only reasonable when you want it fixed immediately (or maybe it’s only me. I can’t seem to have the patience to wait for the plumber). The secret is in mixing baking soda with vinegar and oh boy, it will cut through smoothly. You also know what they say; prevention is better than cure, therefore, instead of dealing with a clog, you can clean the sink’s drain frequently. This will also rid of lingering odor. Simply add a cup of baking soda and let it sit for an hour. Next, pour in two cups of boil vinegar; you will have a clean drain with very minimum effort.

Put out grease fire

Image result for greasefire images

The first rule about putting out a grease fire is to never use water, can’t help thinking where that leaves us. Regardless, I looked for ways I can deal with the emergency if it occurs. You wouldn’t want to try guessing the guy I found for the job? When baking soda is heated, it gives off carbon dioxide, which helps to smother the flames. Sure, you will need quite an amount but baking soda is great. It is most efficient in minor grease or electrical kitchen.  Make sure to turn off the source if you can then, throw a handful of baking soda at the base of the fire.

Laundry

Image result for laundry with baking soda images

It doesn’t mean you give up on the laundry detergent that is working for you. You can use it to give a boost to your laundry detergent to make it work harder. A better pH balance in washing gets clothes cleaner. You can as well use it separately because it brightens and deodorizes clothing. If you are a workout or sports person, you know how gross your gear and equipment can get. A mixture of baking soda and warm water will help you big time.

Removing mildew from the bathroom

Using a clean damp sponge, apply some baking soda and scrub your tub and tiles. They will be gleaming in no time.

Eliminate garbage bin odor

Sometimes there’s very little we can do about the trash in our home, but by putting some baking soda in the bottom of the bin to reduce the trash stink by half.

Cleaning greasy grill and oven

When summer is around the corner, we can already smell barbeque. While dad can offer to grill the chicken, you will be the one doing the cleaning. So you need all the help you can get, therefore, combat that grime by sprinkling some baking soda on your grill-cleaning brush and then scrub. The same applies to your oven, which might be less gross.

Cleaning the microwave

Image result for cleaning the microwave images

No one would like an irritating odor wafting from their microwave. Whereas, you wouldn’t also want to be overwhelming when washing and leaving it smelling like some bleach you used. Simply takes a mixture of water and vinegar, place it in a bowl. Take the bowl, place it in the microwave wave and set on for 30 seconds. After that, put dab some clean dump sponge in baking soda and wipe through your appliance. After rinsing well with water, it will pristine clean.

Removing tea and coffee stains

Image result for coffee and tea stains images

Having a cup of tea or coffee in the morning is a day well began. But things become embarrassing when you have guests and offer them coffee on stained mugs. It might not be a great sin, but you never get a second chance to make a first impression. Instead of buying a new set, wash them with ¼ cup of baking soda and a quart of warm water. If the stain is stubborn, try soaking overnight with baking soda and a detergent.

Albeit you can now buy more boxes of baking soda and put it into more use.

The post 10 cleaning problems you can solve with baking soda appeared first on Cleaning Exec Cleaning Services.


from
https://cleaningexec.com/blog/10-cleaning-problems-you-can-solve-with-baking-soda/

8 Tips For Cleaning Your Pillow

While an expensive bed is a great investment and a good step to ensuring you have a great night sleep, without a pillow it’s incomplete. It actually surprises me how an impressive amount of people overlook the benefits of a good pillow. You never know, the lack of a good pillow (among other reasons of course), might be the cause of your insomnia– sounds farfetched but it’s true. But if you are reading this, albeit you’ve already shopped for one and now the washing is the issue.

This being a free-judgment zone, I’ll admit that washing pillows was not a thing I was keen on as long as the dirt is not showing. Who washes pillows? Come on, for me it was an annual event, which I could just get new ones. As long as I dutifully launder my pillowcases, I’m more than set for life. That is what I previously thought until I knew the consequences of a filthy one. The grossness of dead skin and dust mites aside, there are legitimate health ramifications as well.

Studies show that troubled sleepers (can be caused by your dirty pillow) are 6 times more likely to develop type 2 diabetes and the dreaded flu too. Did you know that your pillow doubles in weight after a period of time because of dirt accumulation? Oh boy….. But at least you have the question answered. Unless you are filthy rich, it is not exactly a financially sound decision to buy new pillows after every week. Here are tips that have been used and tested to clean your pillows.

Laundering instructions

Image result for laundering pillow images


Frankly, one in ten people starts by checking the label for any laundering instructions as long as they have an idea of what the fabric might be. While most of us have gotten away with this, it is essential that you read it and follow the instructions. Cloth manufacturers are required by the law to have fabric care label attached to each cloth. Care labels have the information that will help you take care of your pillow in the best way possible. Most down pillows can be tossed in the washing machine while some only have to be dry-cleaned.

Using the washer

Image result for laundering pillow images

Good news! You can actually use the washer for your pillows. It is recommended you wash two at a time to keep the washer balanced. You can also use either the top- or front- loading machine as long as it doesn’t have an agitator (the large swaddle found in the middle of the machine, designed to rotates water and clothes). To avoid damage, if you only have a top launder with an agitator, then place the pillow vertical. Additionally, if you don’t have specific instructions, you can use warm water and gentle cycle.

The pillow filers are determiners of whether machine wash is suitable or not. Feather is machine friendly filler as long as there are no tears in the pillow cover. It is critical to use a small amount of detergent, and mild liquid is preferred to powder for easier rinsing. With foam fillers, it is unfortunate that a machine can’t be used. To remove dust from foam pillows, vacuum with a dialed down the suction level if possible for both sides with the upholstery tool. Another option is to tumble the pillow in the dryer set at an air-only cycle for around 15 minutes.

In drying

Image result for drying pillows images

Dry according to the care label on the pillow. If you get the pillows for drying, place them with a few tennis balls which will help in the fluffing process while also preventing the down from clumping and drying unevenly. You can also consider taking them out periodically and fluff by hand, using your fingers to break up any clumps. As much as using the tennis ball will reduce their dying period, pillows will definitely take longer to dry than another load of clothes. Therefore, if you smell a musty smell, set them in the sun for a while. In feather pillows, drying is the most time-consuming part because the feathers must be completely dry or they’ll clump together, mildew or fall apart. Therefore ensure to be patient enough and use low heat on them to prevent damage. Just a tip: fluff down your pillows in the dryer between washings for 10 minutes. A short time in the dryer prevents moisture from building up in the down so they remain fresher and require less frequent washing.

Spot clean

Image result for white pillows images

Whether you have seen the ‘spot clean only’ label on the care label of the pillow, or you are not up for washing the entire pillow, spot cleaning works. A ‘spot cleaning’ label means you can only clean where there is visible stain by hand without subjecting it a washing machine, wet cleaning, dry cleaning or/and any restoration process. It important to take extra care if you have a spot cleaning pillow like foam pillows. Ensure that it is not heavily soiled by having pillowcases plus ensuring your hair is clean.

Use vodka

Vodka is not just for cocktails anymore, it is a versatile product with potent cleaning powers. The grain-based liquor can perform many of the same tasks as vinegar but without any odor.  It is actually a quick-drying sanitizer. Add vodka to a spray bottle and spritz on your pillow and let them dry. You won’t be washing the pillow every week when doing the sheets, therefore, use vodka to freshen them up.  Add a ½ mixture of vodka and water to a spray bottle and spritz on your pillow and let them dry. You can also add up 30 to 40 drops of lavender essential oils for nice fragrance.

Wash pillowcase

Image result for washing pillow cases images

While we are happy to fork out hundreds on swanky bed linen, all too often the humble pillow draws a short straw. Regardless of the pillow you use, you should get a pillow protector or case and wash it weekly. They help keep your pillow clean for longer and prevent heavy soiling.

The type of pillow you use totally depends on you. While good quality pillows help in having a good night sleep, you should always keep them clean to prevent allergies and other distresses caused by a dirty pillow.


The post 8 Tips For Cleaning Your Pillow appeared first on Cleaning Exec Cleaning Services.


from
https://cleaningexec.com/blog/8-tips-for-cleaning-your-pillow/

Sunday 18 March 2018

Ways To Decorate Your Home With Flowers

Just like colors, flowers have such a perfect way of adding glamour and beauty to any home. You can choose to have flowers outside or inside your house, either way, you can rest assured the appearance of your house won’t be the same. Either natural or artificial flower will just do the trick. With the right inspiration and advice, you can arrange different flowers and turn your house into a breath-taking scene. Over the years, flowers have been known to bring a sense of completeness and freshness in any setting, indoor or outdoor. Well, some people do crave having flowers in their homes but they just don’t know how to go about it. There are some easy and fascinating ways of decorating a house with flowers and make your house look glamorous. Here are some of those ways.

Put that pot to use.

Related image

Clay pots will definitely come in handy when decorating your home with flowers or even plants. Clay pots are easily portable making them a very good option for holding flowers thus you can easily move your flowers from one corner of the house to the other. Another advantage clay pots have is that they can easily be customized into a color and a design that matches your flowers. Imagine the beautiful view of having white roses in a white clay pot with artistic designs. Such a combination will bring freshness and elegance to your room.


A vase with colored water.

Related image

Normally, people tend to have vases with clear water something that now seems like a cliché. To add an extra touch of beauty to your home, you can use colored water in your flower vases. This can be achieved by adding food dye chemicals into the water. These chemicals aren’t hazardous to your flowers in any way so you don’t have to worry about the health of your flowers. As a matter of fact, flowers such as white rose change their color to match that of the colored water. This is such a nice experiment that you should give a try.


Glass jars with marbles.

Image result for glass jars with flowers and marbles images

Glass jars are one of the best, if not the best, alternatives for holding flowers. Just like clay pots, they are easily portable hence flower arrangement in your house becomes an easy task. Glass jars are crystal clear making it possible to add marbles, pebbles or even shells. These decorations combined with flowers form such an artistic view that brightens up the appearance in your house. However, it’s worth noting that, glass jars are very fragile thus they should be handled with utter care.

Time to fill up the empty spaces.

It could be a certain corner or even the floor, but for certain there will be a part of your house that needs to be filled. One of the best ways of making use of these empty spaces is the use of flowers. If you have an empty corner, you can erect simple shelves that can hold several jars filled with flowers. You can turn this corner into a lovely and inviting sanctuary. You can incorporate different kinds of flowers that blend well with each other. This for sure is a gorgeous way of decorating your house.

Using bottles as vases.

Image result for bottle flower vases images

There are various easy and cheap ways of decorating a house using flowers. Flower vases may be hard to get because of prices or maybe they aren’t readily available at a local store. Well, that shouldn’t hinder you from turning the look of your hand around. Water or wine bottles can easily be used to hold flowers. Bottles come in different size, color and shape making them very ideal. These bottles can then be placed on a shelf in a linear form where they can easily draw the attention of anyone entering your house. These bottles, however, should be handled with utmost care to avoid breakage.

Floating flowers.


Floating flowers are very elegant and ooze a lot of beauty in any home or office. Fill a shallow and clear container with water and then put floating flowers. This technique is very charming, just to say the least. You can use red or white petals and you can rest assured that the results will be more than elegant. You can put the container with flowers on the floor or on a table. If you have flowers that are either broken or wilting, you can cut their buds and place them in a shallow container or bowl. This will help maintain their fragrance and freshness for a longer time.


A door with flowers.

You can get more creative and make your house door more interesting and appealing by putting up flowers on the door. You can choose to hang a single flower or a wreath. This makes your door look very attractive and it signifies that the owner of that house actually loves flowers. Additionally, it makes your door look detailed. The flowers don’t necessarily have to match with the color of the door.

Bedside drawers.

Bedside drawers normally don’t hold a lot of things other than lampshades hence there is enough space to put a jar of flowers. You can opt for floating flowers or red roses in a small jar. Flowers in a bedroom add freshness and make your bedroom look attractive. Flowers are very colorful hence when placed in any room they make your room look bright.

Create a flower chain.

Image result for home flower chain images

A string of flowers can be attached together and hang across the hallway. Floral chains change the appearance of any house and they bring out magical and lovely look in your house.


Flowers are very beautiful and there are so many ways of incorporating various flowers in your home and make your home look marvelous. Flowers don’t require too much maintenance but you should prune them from time to time in order to eliminate broken and wilted parts. Flowers, however, attract insects so as a precaution you shouldn’t leave your windows and doors open for such lengthy periods.


The post Ways To Decorate Your Home With Flowers appeared first on Cleaning Exec Cleaning Services.


from
https://cleaningexec.com/blog/ways-decorate-home-flowers/

Tips For Cleaning Makeup And Beauty Tools.

The most valued and treasured items among many are beauty products and accessories for both men and women. It is therefore very important to take care of them as they are sensitive and very easy to get damaged which can be costly. Lack of proper hygiene can cause the products to react with your skin, leaving you with acne in severe cases. Some of us may even assume that the products we use are the ones affecting us. Here are some tips to help you clean your makeup tools .

Come up with a routine when going to bed.

Once you are done with the day before you go to shower, make it a habit to clean the makeup off your face. Just get some cotton wool and dump it with warm water then use it to rub off your make up beginning with your eyeshadow. Remember to take off your artificial lashes before you start cleaning out your makeup. This will prevent any makeup from getting into your eyes or mouth as the shower runs on your face. The routine will also ensure that you  clean your makeup tools  after you finish washing off the makeup.

  1. Cleaning your brushes.

Image result for cleaning makeup brush images

Makeup brushes are the most used tools for applying makeup. However, we rarely find time to clean them or even replace once the bristles become weak since we hardly notice. The best way is to come up with a weekly routine to clean them. Pick a day which you are less occupied like on a weekend and go through all your brushes. You can soak them in warm water and add a little vinegar just to make sure the stains are gotten rid of. It is also advisable that you use a single brush for every shade of foundation you are applying to prevent mixing the colors which in turn might come up with a foreign color on your face. Ensure that your brushes dry out laid down flat on the table or squeeze all the water out.

  1. Lipsticks and lip liners.

There is that greasy or rugged feeling you get after you apply the same lipstick for a long period of time. This is due to the continued application during the day without cleaning up your lips first before you re-apply them. A thick kind of smudgy layer will appear on your lipstick. The best way to clean this mess up is carefully scraping off the top layer every time you notice the smudge. For lipsticks that have a brush, simply replace the brush from time to time  after cleaning it frequently for best results.

  1. Nail polish brush.

Image result for nail polish brush images

Do not leave your nail polish open for too long as it will dry up on the brush and mess up your polish every time you apply on your nails. If the damage is already done, don’t worry, take a piece of cotton wool and wet it using nail polish remover then press it on the nail polish brush as you run through the bristles. You can choose to do this once in a month.

Soak your sponges for at least ten minutes before rubbing them with your hands as you target the areas that still have the products in them. Do not rub so vigorously as they are a bit gentle and may wither. Rinse them thoroughly with clean water and leave to dry overnight. Be sure that the sponges are completely dry before using them the next morning.


  1. Razors and nail cutters.

Image result for razors images

Repeated use of razors without cleaning can be harsh on your skin. It may cause skin irritation and bumps that are very stubborn to treat or may leave some spots even after treating. It is advisable that you clean your razor using surgical spirit after every shave. This also applies to nail cutters. Be sure to clean them each time you are done using to prevent the spread of germs after you cut yourself.

  1. Face Towels.

As weird as it may sound, a face towel is also part of the beauty tools that we use. Before you apply any makeup, you have to take a shower and most of us use face towels to clean ourselves. It is, therefore, a good idea to always keep it very clean since germs can transfer from it to our face. Soak your towel twice a week in soapy water and wash it thoroughly just to make sure that its hygiene is always in check.

  1. Sterilize your tools.

Things like tweezers could be a breeding hub for bacteria. Dip your tweezers in baking soda mix with vinegar just to make sure that you have all the stains out. If you notice any rust, it is better that you dispose of the tweezers immediately.

Our hair contains a lot of products which are very greasy. Brushing through the hair leaves the brush sticky and very hairy. Take out the hair from the brush using your hands then dip the brush in slightly hot water for the grease to melt off then in a separate bowl, take warm water with liquid soap get an old toothbrush to scrub the remaining dirt off. Rinse it then hand it to dry.

You may think that items like bracelets and earrings do not contain any germs or bacteria but they do. Some even accumulate dust while on your arm, ears or ankles. Get a cotton cloth with surgical spirit and wipe them thoroughly every time you wear them. You can also clean your entire jewelry box weekly just to make sure your stuff is in a clean place.

All of the products that we use need cleaning from time to time. Do not forget to check on the expiry date as you may find yourself using a single product for a long period of time without notice. Replace your tools from time to time.  It is recommended that you do not share your items especially things like eyeliner, lipsticks, and mascara. Do not also clean those using very harsh detergents or bleaches.
 

The post Tips For Cleaning Makeup And Beauty Tools. appeared first on Cleaning Exec Cleaning Services.


from
https://cleaningexec.com/blog/tips-cleaning-makeup-beauty-tools/

Top Boring House Chores in Your Home

House chores help us to stay on top of clutter and as a result, have an organized home. But if the thought of cleaning doesn’t thrill you, don’t worry, you are neither weird nor alone. Not many people look forward to doing house chores. Although having so many other things we rather do, we can’t live in filth. Even though everyone wants a sparkling home, getting there can be quite a chore by itself. Therefore, what a better way to get back at these responsibilities than shaming the ultimately boring ones? While you might totally not be a fun, surely, there are some chores that are quite exciting and others are just playing at a whole new level. No matter how much you try loving them, it just doesn’t get there. And we are going to shame them for making us miserable. I know you are loving me right now, I’m loving me too. I’ve waited too long for this. Let’s get right into it!

Vacuuming

Image result for vacuuming images

I know I shouldn’t be complaining about vacuuming in the first place. People back then had to get on their hands and knees to clean the floor, but I don’t find the process exciting. Especially moving things around. It even gets worse if you have kids because they just come with clutter as a bonus. It is not fun trying to shift stuff so that you may clean underneath. Plus I have to do it daily because of my kids’ welfare and I must retrieve a toy or two daily beneath the furniture.

Cleaning the windows

Image result for window cleaning images

Cleaning windows can be one of those dreary thankless chores. I know we have all been there once. Where you spend an impressive two hours cleaning your windows, only to get back in the house and all you see is the streak. Ugh! The level of disappointment that comes with the sight just makes cleaning windows so boring. First experiences are very key to establishing the feeling you develop towards a task. When I first cleaned my windows, I kept on repeating but all I got is streak after streak (probably because I was doing the same thing expecting different results. Someone once called that insanity). All I needed was that first experience and I couldn’t look forward to washing them again. Gradually, I realized there’s something I was definitely doing wrong. Therefore I found ways to do it better. But as much as they get clean nowadays, they don’t make it to my list of fun chores. Just a tip, it will hugely help to choose a dry, cloudy day to clean your windows than when it’s blazing hot.

Ironing

Image result for ironing images

This gets personal. I don’t know what it is about ironing, but I find it so boring. Yet I cannot for the life of me bring myself to wear anything wrinkled. How about that for irony? Doing laundry is not such a big deal for me but ironing does me in every time. In fact, I can’t recall how many times I have talked myself into wearing jeans just because I didn’t need to iron them. Whenever I’m ironing, I start thinking about the meaning of life and how irrelevant ironing should be. It just does things to me and I find great satisfaction when the chore is done. The brilliant I looked for ways to make it easier and since I’m feeling generous, ill share a tip. The best way to avoid spending hours ironing is to do it immediately after drying. Also, don’t let it over dry. Moreover, investing in a good iron reduces your workload by half.

Cleaning out the fridge

Image result for cleaning the fridge images

Some people can’t wait to clean their fridge but I dread the process. Seriously, I just didn’t see why someone would clean their fridge on a weekly basis. But I got my answer when a foul smell wafted from my fridge the other day. You are free to judge. Well, it might sound like a no-brainer but I’m quite poor at remembering when and what remained. Therefore, I just had to go throw all the packages and see where the smell was coming from. That gave me an opportunity to clean my fridge and it left me feeling great. Though don’t get things twisted, I still dread doing it. Now I’ve written a reminder and placed it in the fridge to clean it out again next month.

Decluttering

Image result for decluttering images

It is this task that makes grown men weep, not that it is hard but the uncertainty in it is overwhelming. Have you ever been in a position where you seriously know you need to cut on some of your possessions but don’t know where to begin? It is depressing. Personally, I can designate a day just to declutter, only by the end of the task I realize there’s no significant change I have made. I don’t consider wastage of my time fun. Regardless, I start on  smart ways of decluttering and it is totally working. I made a decision one week ago, to give or throw away one thing every day. I like where I’m headed. I’ve also realized decluttering isn’t always about throwing stuff away, sometimes it just means to sort through things that you actually want to keep. That, for me, makes decluttering much easier.

Cleaning the toilet

Image result for cleaning the toilet images

With kids in the house, needless to say, the toilet is sometimes gross. I never thought I’d grow up, get married then start spending my time calling my kids to confirm whose poo is in the bowl. And kids are sometimes little devils, they will all come, make a face and answer,’ seriously mom, that’s not mine.’ Sometimes I could just return them wherever they came from. Unlike laundry, I usually wash my toilets every day because they are very germy and heaven knows I can’t handle them if they get any grosser.

Just for feeling generous, we also had: pairing socks, cleaning the oven, emptying the bin and most importantly, being an adult. Boring chores  should be done all the same because if neglected your home will be anything but clean and livable.


The post Top Boring House Chores in Your Home appeared first on Cleaning Exec Cleaning Services.


from
https://cleaningexec.com/blog/top-boring-house-chores-in-your-home/

Sunday 4 March 2018

10 Things In Your Home That You Might Not Be Replacing Often Enough.

At times we go through our whole house, spring cleaning, decluttering, vacuuming everywhere and at the end of it, we tend to think that we have done all that needs to be done. Correction, there is more to it than just cleaning. Even the clean freaks tend to miss one more thing that makes the whole house fresh from any kind of contamination and harm as others may put it. This is the most important of all. Replacing stuff around the house. Without a doubt, you will find two or more things that you never thought of replacing in your home.

  1. Toilet Brush.

Image result for toilet brush images

Most of us just assume that a toilet brush is meant to clean the toilet and it’s gross. Well, yes it is but the situation worsens when you overstay with one brush almost forever. Some of our toilet brushes are even older than our kids. You just don’t seem to think about replacing it. Toilet hygiene is very important around the house. By not replacing the toilet brush over a few months or even years, you will be returning the same germs over and over again since the bristles will be too soft to scrub out germs no matter what toilet cleaners you use.

It is important that we change our pillows at least once or twice a year. Some of us sleep with our heads uncovered and therefore transferring the dust that the hair has accumulated to the pillowcase.  Whether we use the pillow case or not, the dirt will always be seen on the pillow after some time.  Always be sure to be keen on the kid’s pillows as well and you could even mark the date you bought them just as a guideline for when to replace them.

  1. Tooth Brush.

Image result for toothbrushes images

Honestly, this is even advertised on T.V that toothbrushes should be replaced after every three months. Sometimes you may ignore but it is essential as it helps to keep your teeth healthy and minimizes trips to the dentist every now and then. As simple as it is, it is a very important part of our day to day life so every time you go brush your teeth, be sure to remember when to replace it as well.

  1. Mattress cover.

Related image

Every night you spend hours and hours on your bed, you drool and sweat as you sleep on it, therefore it is very important that you should think of replacing it once in a while. If ignored, it might attract all kinds of pests including bed bugs and mites.

  1. Makeup brush.

Image result for makeup brushes images

Our makeup sets are the next sensitive things since we use them on our faces. Overuse of these brushes may cause it to turn its color or the bristles on the brush might fray. You may notice that a certain product is being harsh on your face after a prolonged use. The problem most likely lies in the brush and not the product. Simply wash the brush or if already frayed, toss it and get another one. More problems may occur, such as minor acne or rashes.


  1. Gas burners.

Image result for gas burners images

Ever wondered where the soot comes from as you are preparing your meal? Dirty gas burners. It all starts from there. Dirt accumulates in the pores of the burner thereby clogging them. This is when you start seeing the soot on your pots. Regular cleaning will prevent this from happening. Not all of us love that job as you may be afraid of worsening the situation. It is therefore advised that you should replace the burners immediately you start noticing soot.

  1. Shaving razors.

Do not wait to get razor burns for you to realize that it is time for you to replace your shaving razor. The best shaving outcome will be noticed after you have started replacing your shaving razor every three, four, or even five shaves. This will even reduce that itchy feeling you get after shaving no matter how much aftershave you apply on your skin. This also applies to women as well and it is very hygienic.

  1. Face Towels.

Image result for face towel images

No matter how much you clean your face towel after a bath, it needs to be replaced as well. Some of us find ourselves with a nearly ragged face towel due to continued usage over the years, yes, years. Replacing it has never crossed our minds. We assume that since its doing the work and nothing alarming has ever happened then there’s no reason for getting rid of it. Unknowingly, it might also be the contributing factor of our skin texture and appearance so keep track of how long you have been using the face towel and get another one.

  1. Lotions and oils.

Be sure to check the expiry date of the products that you use around the house and for yourself. You may want to get bulk quantities of your products but are you keen on their dates as most of them only tend to last a year or two whereas you may find yourself having used the same bottle of lotion for a longer period than indicated on it. Some of them don’t even last a year like mascara, eyeshadow or lip liner so be sure to check their shelf life before getting them.

  1. Kitchen Sponge.

Image result for kitchen sponge images

Try and replace your kitchen sponge every month as it can harbor very many diseases in form of germs. The kitchen sponge mostly stays dump making it very prone to infestation by germs. After cleaning your utensils, it is advisable that you clean the sponge and rinse thoroughly then air it out in the sun if the season allows. Alternatively, you could place it in a microwave for an effective way of getting rid of germs. It might be the cause of some of the illnesses especially in children below five years as they play around and come across it.

Those are the most common things that most homeowners don’t replace. It might be time to take stock of the items in your home and if an item that is often replaced has been in your house for more than two years, then it is proper that you give it the boot and buy a new version of it.

The post 10 Things In Your Home That You Might Not Be Replacing Often Enough. appeared first on Cleaning Exec Cleaning Services.


from
https://cleaningexec.com/blog/10-things-home-might-not-replacing-often-enough/

Cleaning Games That Make Those Boring Chores Fun

Cleanliness is the most important task to do in our lives. Imagine living in a messy environment with garbage all over the house, and toys almost everywhere you step. You can almost go nuts just at the thought of it let alone the sight. That’s why you have to do daily chores to keep the house tidy. Chores are not that exciting to do and as our kids grow, they develop a habit of not wanting to do any of that. Here are some few tips on how you can make it fun for your kids as they learn to clean after themselves.

  1. Make them look for clues as they clean.

Image result for kids cleaning at home images

Trying to get your kids up to go and clean something like the artic is next to impossible. Rather, you can try putting notes in form of clues as to what they might find when cleaning. Put some gifts like toys here and there and do not forget to also include snacks for them to have during their break time. They will always be looking forward to having another cleaning adventure.

  1. Compose a song.

Entertainment in form of music always gets you up on your feet to dance once you hear the beat. Why not make it fun for your kids when cleaning with some background music? You can even sing as you teach them how to clean. A good example of a song is, ‘follow the leader’. Go ahead of them and tell them to follow the leader in this case you. Tell them something like ‘take the mop, go two steps back and mop through’ then ask them to go lower under the couch in a rhythm form as they are getting the dirt out from underneath it. Make sure there’s a background music beat same to that of a gym. They will not only have fun while cleaning but they can burn calories too to keep fit.

  1. Have them clean in costumes.

Image result for kids in costumes cleaning images

Kids love playing pretend and they like costumes to go with the character they are pretending to be. Why not have them dress up in whatever they want for instance a Superman costume who comes to save the ‘city’ from the choking smell of garbage? They will always look forward to garbage day or even the little maid who goes to clean the dishes as the butler is clearing the table. It’s even hilarious as they are speaking with the ascents of the sophisticated butlers as we see in the movies.

  1. Let them have a competition.

You could involve them in a competition for who puts their toys in the right manner and position they should be in. It’s even more fun to set a timer for them to see the time they took to gather all their toys. The winner is the one who will have organized them in the correct way. This will give them that urge of always wanting to be the winner in the game of cleaning their stuff. However, congratulate both of them for a job well done.

  1. Get kid-friendly cleaning supplies.

Do not strain your kids with oversized cleaning tools as they will get tired faster and hate the chores even more. Try getting colorful stuff that will first attract them. Surprisingly, you will find them treating the supplies as toys. For instance, if you want your boys to clean the windows, you can get them a water gun to use as a spritz bottle. Let them clean in ‘action’ as they would probably term the activity. You can let the girls play house with the stuff as well and in the process, they will have cleaned the house.


  1. Let them arrange their wardrobe in style.

Image result for arranged kid wardrobe images

When you or your kids look for what to wear, the end result is a very messy looking room with clothes all over the place. One way of helping your kids get used to organizing their wardrobe is to take your phone and take pictures of your kids holding their outfits on their bodies then showcase the photos for them to see how it turned out. Let it be some sort of fashion show.

  1. Create a mini-quest for them.

Having to get rid of leaves that fall off the tree in your compound is a very monotonous and tiring task for everyone. When it’s time for them to clear off the piled leaves, you could place some small toys under one or two piles for them. Let them know that there is something hidden in the pile and for them to get it, they have to clear dirt. This really excites kids as they are looking forward to knowing what they will find.

  1. Make chore scratch cards.

Let their chores be a secret and have them select a scratch card to reveal what kind of chore they are to do. Kids love finding things out and the moment they are scratching to get their task, you will see them doing it with a lot of anticipation. Do not just put a chore in there without giving some kind of reward too. To them, it will seem like they have won something after a day of work.

  1. Involve yourself too.

Make chore time a bonding time as well. Our kids love attention and usually, toddlers love to tell us stories. If you have that kind of child that just love being around you as you do your cleaning, why not also involve yourself as he does his cleaning and let him ask questions as you try to help him out on what he can’t fully do. Always give positive compliments once he finishes the work. This will encourage your child to become open-minded and confident. Inlcude cleaning games to keep such a person motivated.

Those are just but a few of some ideas on how to make chores fun with cleaning games. Be cautious when giving chores. Avoid being bossy as this will make the kids rebellious. Don’t show favoritism on one child simply because the other one is slow or not perfect when it comes to household chores. The whole idea is to be very patient and encouraging to your kids as you show them how it’s done.

The post Cleaning Games That Make Those Boring Chores Fun appeared first on Cleaning Exec Cleaning Services.


from
https://cleaningexec.com/blog/cleaning-games-that-make-those-boring-chores-fun/

Cool Ideas For Organizing Your Kid’s Room

Keeping a kid’s room properly organized often seems like a daunting task. It takes time, hours maybe to organize a kid’s room but it only takes that kid a couple of minutes to mess up the room. Children are born naïve and innocent hence they don’t know how much tiresome it is to organize their rooms off and on, and you can’t blame them for this. However, there are various tips that can help you keep your child’s room properly organized. With proper techniques and the right approach, organizing a kid’s room can seem less tiring and time-consuming. Here are some great ideas on how to keep your child’s room properly organized.

Start with the toys.

 Image result for scattered toys images

In all honesty, a kid’s room isn’t ideally complete if there are no toys for them to play with since toys are part of their lives. It’s easy for them to scatter toys just about anywhere, even under the bed. Kids can cause chaos while playing with toys. First, take an inventory, eliminate any broken or worn out toys. Thereafter, sort the remaining toys in terms of sizes. Toys such as building blocks can be stored in boxes and toys such as stuffed animals can be stored in bigger boxes. Place these boxes neatly on shelves. Regulate which toys the kid gets to play with at certain times so at avoid a scenario where all the toys are scattered everywhere. By keeping the toys organized, you kid will easily find a certain toy when they need it.

Involve the kid.

Image result for cleaning mess with children images

Kids don’t know what it takes to organize a home and this is why mess and kids will often times be said in one breath.  However, children grasp things quickly and when they are shown how to organize their rooms within a few weeks they will be doing it themselves. When organizing their room, involve the kid and start by giving the kid simple tasks such as placing small toys in boxes. This is also a good time to bond with your kid and have some fun by arranging their rooms. They will also give you an opinion on how they want their room to look like. It’s said that, when you train a child on the way to go, he will never depart from it.

Get to the kid’s level.

Organizing a kid’s room, the same way you have organized your room is an effort that won’t bear fruitful results. Kids will do just anything to retrieve a coat or a book placed too high and this will only lead to more mess being created. Look at the room in a kid’s perception so as to best organize it. Invest in lower clothing rods and small-sized hangers. Also, place their books in shelves or drawers that they can easily access. If the system employed to organize a room fits the kid’s perception, be sure the kid will maintain the room as neat as possible.

Invest in multipurpose furniture.

Image result for multi purpose kid furniture images

A kid’s room isnt spacious so as a parent you don’t have the luxury of buying several kids furniture pieces to fill your kids’ room. It’s then paramount to buy furniture that will serve several purposes at the same time. There are beds that have drawers underneath them, these drawers can be used to store several things such as an extra pair of bedding, seasonal clothes, and other stuff. When buying a study table, consider a table with shelves that can be used to store books and even drawings. Even with the limited available space, you can maximize it and store several things, it’s just a matter of creativity.

Labeling items save the day.

Image result for labeled toy containers

If you want to save yourself a lot of hassles when it comes to organizing a kid’s room, then you should really employ the technique of labeling each item. Small boxes and baskets are items that are plenty in a kid’s room since they are used to store a variety of items. If there are various baskets each designated to store a distinct item, then make sure it’s properly labeled. This ensures the kid doesn’t invade all the baskets looking for just a certain pair of socks. While at it, always put emphasis on the significance of storing items in the appropriate baskets always. This helps the kid appreciate the importance of having things kept properly making work easier for you as a parent.

Create designated areas.

Organizing a kid’s room is a daunting task mainly because kids will scatter everything everywhere. Books will be thrown on the floor, piles of clothes all over the floor, bedding laying on the floor and what have you. Tracing each item and placing it in its rightful position becomes a nightmare for most parents. Having separate areas for different activities saves you a lot of trouble. One corner of the room can be distinctly designated for reading such that there are study tables and shelves for books. In such an instance, only school materials should be in that corner. You can also designate another corner for playing or even for laundry baskets. This form of organization will save you a lot of troubles.

Regular checks.

Having to organize an entire room daily is almost impossible. Rather, divide the work in terms of weeks. In a certain week, you can decide to thoroughly organize all the toys and school materials. Another week you can decide to tackle the closet and shelves. On a weekend, you can then clean up the whole kid’s room and remember to always involve the kid.


The secret behind a well-organized kid’s room is having properly defined storage units since kids are more likely to remember what they have seen. Even with such mechanisms, dealing with an untidy room is something so inevitable since kids love to play and that’s something that they can’t be denied. These tips help you reduce the amount of work you have to deal with, also these tips help you train your child the importance of organization. It’s dangerous and unhealthy for a kid to live in a room full of clutter, thus a well-organizedkid’s room guarantees your kid grows in a safe and healthy environment.

The post Cool Ideas For Organizing Your Kid’s Room appeared first on Cleaning Exec Cleaning Services.


from
https://cleaningexec.com/blog/cool-ideas-organizing-kids-room/